This article is a step-by-step guide to host a website or a web application on your laptop with Windows 7 operating system. Sorry I didn't have time to write for other operating systems.
You may read the article from the beginning to end or if you directly want to kick-start implementing the web server jump to
Steps directly.
OS: Windows 7
Introduction
In plain words, a website is a software that runs inside another software called web server. It is a two way communication system. We have web browser as client side software at our end to request web pages and a software called web server that runs at the server side to respond our requests. We know how to surf webpages with a web browser. In this article I have tried to explain how you can setup your own webserver in your laptop!
LAN and WAN
LAN is an acronym for Local Area Network and WAN is an acronym for Wide Area Network. To understand in simple way: LAN is a network you use inside your home, office, school, colleges etc. WAN is a very large network like the one your ISPs (Internet Service Provider) have to provide you internet connections.
Wireless LAN
Wireless LAN allows you to access your LAN without wires. It requires a wireless adapter in your laptop or any device from which you want to access the network (Most laptops come with built-in wireless adapters) Wireless LAN could be established with a simple wireless router. You can buy one for Rs.1000 ($20). Once you purchase one, you can call your ISP provider to setup it for you. If you need a guide for setting up wireless LAN post a request on the comment space. I'll try to write one if there are more requests.
Intranet and Internet
There are two types of common classifications in website. Intranet, which are used by people inside a company or any group. Internet, is all known public website which is accessible to all public audience.
Intranet are mostly hosted inside the company to provide fast access to its employees and to ensure security from threats of public internet.
IP Address
IP address are numerical address to access any network device like computers, printers, etc. Though there are many technicalities, I'll keep it simple. 127.0.0.1 is a fixed IP address to access local computers (It is called as local loop). In other words, you can type 127.0.0.1 in the web browser in your machine to access the web server hosted in your machine. It is scoped only to the local computer itself. This is useful for testing your website hosted inside your computer during development etc,.
The IP addresses ranging 10.0.0.0 - 10.255.255.255, 172.16.0.0 - 172.31.255.255 and 192.168.0.0 - 192.168.255.255 are local network IP addresses. That is, you could use it to access network resources inside your LAN. Assigning IP address to devices is out of scope of this article. If you need help, you can post your requests on the comment section.
Web Server
As a first step, you need to install a software (web server) to respond to web requests sent from other computers. You can understand the webserver in simple way: it is a software at your end that responds to requests made by software at other end. Here, Internet Information Services (IIS) is the server software and Web Browsers are the are client software on other computers.
Steps:
Following are the steps:
- Install IIS as Web Server
- Create a Website / Web Application or Download Sample
- Host Website to the IIS Root Directory
- Configure IP Address for Your Machine
- Test the Website
1. Install IIS as Web Server
Note: You must be a member of the Administrators group (Windows Admin user) to install IIS.
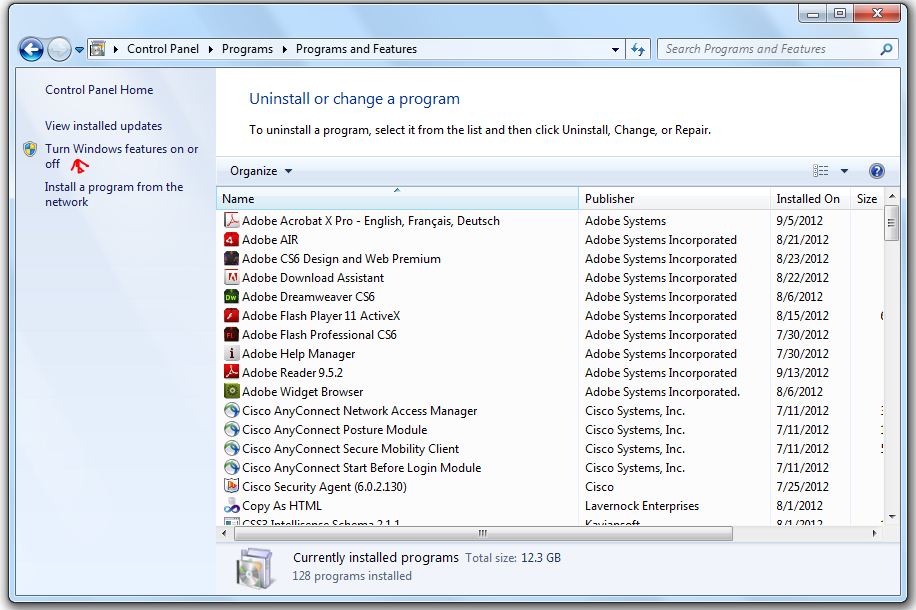
By default, IIS is not installed on Windows® 7. You can install IIS by clicking Windows Features in Advanced Options under Programs in Control Panel.
Click
Start and then click
Control Panel.

In
Control Panel, click
Programs and then click
Turn Windows features on or off.
In the Windows Features dialog box, check Internet Information Services and then click OK.

2. Create a Website / Web Application or Download Sample
You may create your own website or download the sample from the following URL
http://www.risingperfection.com/demo/apps/fb/FileBox.zip
Download the sample web application - FileBox, from the below url. FileBox is a single page simple web application written on ASP.NET C# to upload photos. You may write your own applications or static HTML web pages as well.
3. Host Website to the IIS Root Directory
Open the following folder location and delete all files and folders inside.
C:\inetpub\wwwroot\
Unzip all the files and folders in FileBox to the IIS root folder.
C:\inetpub\wwwroot\
4. Configure IP Address for Your Machine
Now you need to assign an IP address to your machine, if it doesn't exists already.
First, let's check whether you are connected to the LAN network. You may check that in various ways. But the simple way is to ping your switch or router IP address. Usually, but not necessarily, it would be
192.168.1.1. To ping and test open the start menu and type
ping 192.168.1.1 -t (replace the ip with your switch or router ip). You must be able to get response as follow:
If you get any other response then something is wrong with your network. You need to fix that first!
Note: Numerical values of bytes, time, TTL will change for every computer and networks
If the network is working well, check whether you have an IP address assigned. In the command prompt, type
ipconfig -all and press enter. You will see information about the network ip addresses configured to your machine as below.
IPv4 Address is your local machine IP address. If you don't see screen like this, IP is not configured for your machine. You need to configure it manually by following steps below.
Assign IP Address Manually
Step 1: Go to Start menu and search for
View Network Connections
or navigate to
Control Panel\Network and Internet\Network and Sharing Center
Step 2: Click on Local Area Connection or Wireless Network
Step 3: Click
Properties
Step 4: Select Internet Protocol Version 4 (TCP/IPv4) and Click Properties
Step 5: Select
User Configured and enter your desired local IP address within the LAN IP range and click
Ok to save and close all open windows.
Example / Typical Configuration:
IP Address: 192.168.1.2
Subnet Mask: 255.255.255.0
Default Gateway: 192.168.1.1
Preferred DNS: 8.8.8.8
Secondary DNS: 8.8.4.4
5. Test the Website
Test on Local Machine
First, let us test the website from the local machine. Open your webbrowser and navigate to
http://localhost/ or
http://127.0.0.1/. You must be able to see the FileBox homepage.
Test from a Remote Machine
You need another computer or a mobile phone or a tablet connected to the same LAN network to test our webpage. To test the page, open a web browser and navigate to
http://<your machine ip address> (eg:
http://192.168.1.2). You must be able to see the FileBox homepage.
If it fails, you need to go through the steps 1 through 3 again or if you are not able to solve, post your problem in the comment section below to seek solution from me and peer readers.
Hint: If you buy a static IP from your ISP vendor and configure it you can access this website from internet. A static IP would typically cost you Rs.2000 ($40 approx) per year. Also note, this could be useful only for your personal use.
Hope this article would be useful to you. Please share your comments below.